
5 More Photoshop Tips to Make Life Easier (#6 – #10)
Today we are going to look at three Photoshop of the most-used Photoshop tips, as well as a few shortcuts for working with foreground and background colors. As always, email me with any questions. Later this week: working with the History Palette.
6. “Undo” up to 1000 states in Photoshop
Most of you already know that to “undo” something in Photoshop, you hit CTRL/CMD + ALT + Z.
However, as you may have noticed by now, by default, Photoshop will only allow you to “undo” so many times. To change these settings, go to your Preferences (“Photoshop, Preferences” on a Mac; “Edit, Preferences” on a PC) and go to Performance. Change the number of history states to the desired number (I set mine to 1000, which is as high Photoshop will allow you to go). This sets the number of “states” of your document that Photoshop remembers, thereby setting the number of times Photoshop allows you to “undo.” This is also useful when working with the History Palette, which we will get to later this week.

Changing the History States setting in Photoshop
7. Changing brush opacity
When using the brush tool, you can change the brush opacity by simply typing the number you would like the opacity percentage to be. There is no need to click in the opacity box, just typing the numbers anytime the brush tool is selected will change the brush opacity. This allows you to change the opacity of the brush as you are working in Photoshop very quickly.
This trick works with any “brush” tool, including:
- Brush
- Pencil
- Color Replacement Tool
- Mixer Brush Tool
- Clone Stamp
- Pattern Stamp
- History Brush
- Art History Brush
- Eraser
- Background Eraser
- Magic Eraser
It also can be used to change your exposure while using the Burn, Dodge and Sponge tools.
8. Changing your Photoshop View
By pressing “F” you can cycle through the Photoshop screen modes.
By pressing “Tab,” you can hide all toolbars and palettes. Hitting “Tab” again will bring them back.
To hide only the Palettes and leave the toolbars visible, hit “Tab” and “Shift” together. Hit them again to get the Palettes to return.
9. Resetting your default colors in Photoshop
To reset your foreground and background colors to the Photoshop default colors, hit “D” at any time (except when using the Text tool). This will reset your foreground color to black and your background color to white.
10. Toggle between foreground and background colors
To toggle between your foreground colors and the background colors, hit the “X” key (again, except when using the Text tool). This will swap the current foreground and background colors.
How to create Custom Keyboard Shortcuts in InDesign
Adobe did their best when creating keyboard shortcuts in InDesign. They tried to make shortcuts for the most used features that would be easy to use and remember. But there are always going to be those commands that some people use more than others there is no shortcut for (for me, two of those are changing text to uppercase and adding a faint drop shadow). In InDesign, you can make your own custom shortcut for just about anything. You can also reassign a shortcut if you don’t like the default shortcut for that action.
To access your shortcuts window, go to Edit, Keyboard Shortcuts.
Before we get started, let me also give you old Pagemaker and Quark users a great tip – InDesign will let you use the default shortcuts from those programs. If you already know the shortcuts that were used in Pagemaker and Quark, you don’t have to learn a new set of shortcuts. Simply select the appropriate program from the “Set” dropdown menu.

Setting up your keyboard shortcut options
The Keyboard Shortcut window has several helpful options at the very top.
The “New Set” button allows you to make a “Set” of keyboard shortcuts. You can select at different “Set” for certain document(s) or user(s). This could be helpful if you had some documents that required several repetitive commands that a complicated keyboard shortcut (if it has one at all). You could create a set of shortcuts that you could select for those documents with those commands being very easy to access and remember, while using the default shortcuts for other documents.
You can also click “Show Set,” which will open a .txt file of the shortcuts associated with that set.
Creating Keyboard Shortcuts
To create a custom shortcut, select the Product Area desired from the dropdown menu.

Product Area from Keyboard Shortcut Menu in InDesign
Once you select the desired Product Area, then you can select the command for which you would like to set a keyboard shortcut.

Select the desired command
Notice that when you select a command that already has a shortcut assigned to it, it will appear under “Current Shortcuts.” You can remove a current shortcut by clicking the shortcut and then clicking remove. However, it is allowable for commands to have multiple shortcuts.
To add a shortcut, click in the “New Shortcut” box and press the keys that will make up your desired shortcut. See example below.

To make a new shortcut, press the keys that you would like it to be.
If you do not like the shortcut and wish to change it, simply press the desired keys for the new shortcut. Don’t try to delete the text in the New Shortcut box, InDesign won’t let you. Just press the new shortcut and it will replace what is in the New Shortcut box.
Please notice that under the New Shortcut is “Currently Assigned to.” If there is another command currently assigned this shortcut, it will be listed here. See the example below.

The shortcut CTRL + S is already assigned to "Save." Any shortcut that is currently assigned will appear here.
Once you are happy with your New Shortcut, click Assign, then OK. That’s it! You can set as many custom keyboard shortcuts as you like.
Please note: If there is something listed under “Currently Assigned to,” by clicking “Assign” that shortcut will no longer work. Be sure that either you are replacing a shortcut that you never use, or that you are creating a shortcut that is currently unassigned.
Questions? Let me know! And check later this week for 5 more Photoshop tips!
5 InDesign Tips to Make Life Easier (#1)
Last week Photoshop, this week InDesign. Here we go.
1. Selecting objects or frames behind other objects/frames
When designing pages in InDesign, sometimes it is necessary to place objects on top of each other (like placing a text box over an image). It is easy to select the top object or frame, but selecting objects or frames behind it is not so easy (for most people, this involved constantly sending objects to the back, bringing them to the front, etc.) Thankfully, there is a shortcut: Holding down CTRL/CMD and clicking the frame will allow you to cycle through the objects and frames. The first click will select the top object/frame, the second click will select the one immediately behind it, the third click will select the one behind that, and so on.
2. Editing Links in InDesign
If you are working with placed files (links) in InDesign and would like to make a change to that linked file, right click on the link (or select the link in the Links Panel and right click) and choose Edit Original. The linked file will automatically open in the default application for that file (based on its file extension and your default settings). If you would like open the file in a different program, when you right click on the link, select Edit With and choose the correct program. Once you make changes, save and close the file. The changes should automatically update in InDesign. If the changes are not reflected in your InDesign document, click on the link in the Links Panel and click on the Update icon (see below).

3. Shortcuts for switching tools
InDesign makes switching tools so easy – the only problem is remembering them. Here are a few easy ones:
Hit the “T” key at any time to switch to the Text tool.
Hit the “V” key at any time to switch to the Selection tool.
Hit the “R” key at any time to switch to the Rotate tool.
There are many more, and if there isn’t a shortcut for a tool that you regularly use, you can make a custom shortcut (I’ll post a how-to later this week)! For a complete list of Adobe shortcuts, click here. All shortcuts are listed in parenthesis after the tool name.
4. You can do math in the control panel
Have you ever been working on a design and decided that you wanted the shape that you are working with to be 25% larger? In InDesign, there is no need for a calculator. Just select the object you would like to change and click after the appropriate size in the control panel box. The you can type “+ 25%” in the control panel box and InDesign will do the math for you!
You can add, subtract, multiply and divide in InDesign’s control panel. See examples below.

Examples of how to do math in the InDesign Control Panel
5. Converting Shapes
Let’s say you are working with a rectangle – you have it the perfect color, perfect size, text in size of it with the text frame options set. Then your client/boss tells you they want an oval instead. Simple enough. Just select the shape and go to Object, Convert Shape and choose the desired shape.

To convert the shape in InDesign, go to Object, Convert Shape and select the desired shape.
You can also do this in the Pathfinder panel (Window, Object & Layout, Pathfinder). Select the shape and click on the desired shape in the Pathfinder panel under Convert Shape. The Pathfinder panel can do several other neat and time saving tricks, but we will get to that next week.

To convert a shape using the Pathfinder Window, just click on the desired shape under the Convert Shape header.
As always, please let me know if you have any questions, or would like to know something specific! Later this week, I will post on creating your own custom shortcut, as well as 5 more Photoshop tips so be on the lookout!
Accessing Photoshop Layer Visibility in InDesign
Did you know that when working with a PSD document in InDesign, you don’t have to go back to Photoshop to turn on/off layer visibility or layer comps? Beginning with CS2, InDesign allows you to control a PSD file’s layer or layer comp visibility within InDesign.
Layer Visibility
To access layer visibility in InDesign, first place the PSD document in InDesign (File, Place). With the PSD file selected in InDesign, go to Object, Object Layer Options. This will bring up the following dialog box:

Object Layer Options Dialog Window
As if you were in Photoshop, simply click on the “eye” beside each layer or layer group to turn that layer on/off. If you are using a file with a very large number of layers remember to be patient and give InDesign time to make the requested adjustments. When you change the visibility of layers in InDesign, you are not changing the PSD file at all. If will have the same layer visibility as it did when you last saved it.
One more important thing: There is an “Update Link Options” drop down menu at the bottom of the dialog window. Be sure that you select the option that you would like to use to eliminate setting the visibility over again. If you make changes in the Photoshop document and would like for the visibility of the layers to remain the same when the file is updated in InDesign, choose “Keep Layer Visibility Overrides.” If you would like for updating the PSD file in InDesign to cause the visibility of the layers in InDesign to revert back to the default visibility set in Photoshop, choose “Use Photoshop’s Layer Visibility.”

InDesign Visibility Override Options
Layer Comp Visibility
You can also access Layer Comps for PSD files in this same dialog window (see below). If you have set Layer Comps in Photoshop, simply choose the Layer Comp that you would like to be visible in InDesign. Need to know how to make a Layer Comp in Photoshop and why you would want to? Check back next week to find out.

Layer Comp Visibility Options in InDesign
Unfortunately, these option are not available when using TIFFs, only when placing PSD files. Questions? Let me know!

5 Photoshop Tips to make your life easier
There are so many shortcuts and tips for Photoshop users that will save you time (and save you from getting carpal tunnel), that it can be overwhelming. When I first started learning about all of these, my brain was on overload. While working, I would know there was a shortcut for what I was trying to do, but I just couldn’t remember it. After searching online I would find the shortcut, only to find that even though I saved time by using it, the time spent searching for it put me back on the schedule I was on in the first place.
For that reason I decided to post these shortcuts and tips in groups of 5. In a week or two, I will post 5 more. As always, if you have a specific question, please don’t hesitate to email me. Be on the lookout for 5 InDesign Tips next week!
1. Copy Layer Style
So many times we get an effect on a layer that we would like to quickly put on several other layers (color overlays, drop shadows, etc), without having to remembering the exact settings. Enter “Copy Layer Style.” Simply right-click on the layer you wish to copy the style from and choose copy layer style. Then click on the layer you would like to apply the layer style to and right-click. Choose Paste Layer Style. Easy as that. You can continue to paste as many times as are needed.

Photoshop lets you copy and paste layer styles.
2. Copy Layer
Want to make 5 duplicate layers of the one you just created? You could right-click on the layer, click duplicate layer, enter the appropriate options, then click “OK.” OR you could use the very easy shortcut for copying layers in Photoshop. Simply hold down the ALT key, click the layer to be copied, drag and drop it.*
*Note: Your background layer has to be unlocked for this to work. To unlock the background layer, double-click on the layer and click “OK.”3. Space bar Hand Tool
Anytime you are working with in Photoshop and would like to bring up the hand tool (used to move around the image), there is no need to change tools. Simply hold down the space bar and the hand tool will appear. When you release the space bar, you will be using the same tool you were before. The only time that this trick will not work is when you are using the Text tool (for obvious reasons).
4. ALT and Click on the eye icon to hide all layers except the active one
Anytime that you would like to turn off the visibility of all but one layer, simply hold down the ALT key and click on the “eye” of the layer you want to remain visible (see below). The layer you clicked on will remain visible, while all other layers will become invisible. This also works for groups – simply click on the eye beside the group name and layers in that group will remain visible while all other layers will not. This is extremely helpful in working with websites built in PSD, or in PSD files that come to you from other sources with generic layer descriptions.

5. Changing your brush size
Some of you may know that you can change your brush size in Photoshop by using the opening bracket ( [ ) to make the brush smaller and the closing bracket ( ] ) to make the brush larger. This works not only with the Brush tool, but also the Quick Selection tool, Healing tool, Clone Stamp and any other tools in Photoshop that brush size can be changed. You can also change the hardness of the brush by holding down the shift key while pressing the [ and ] key.
But you can also change your brush size by:
PC: Holding down the ALT key, right-clicking and dragging the mouse to the right or left
Mac: Holding down the CTRL and OPT key and dragging the mouse to the right or the left
By dragging mouse up and down, instead of right and left, you can change the hardness of the brush
This option gives you slightly more control over the increments between sizes.

Finding “Ignore Text Wrap” in InDesign, plus Inset Spacing and Vertical Alignment
The question I get asked most often (even by people that have been using InDesign for years) is “How do I get a text box to ignore a text wrap?” Unlike most of the tools in InDesign, Adobe has somewhat hidden this important feature. To access it, select your text box and go to Object, Text Frame Options (or CTRL/CMD + “B”). (You can also hold down the Option key and double-click the text box using either arrow.)

Text Frame Options Dialog Box
One the dialog box appears, you will see the “Ignore Text Wrap” checkbox towards the bottom. But what you may notice is that there are several features in this dialog box that may be helpful to you when you are designing. This dialog box is where you can vertically align text (Top, Center, Bottom or Justify), change your column settings and add inset spacing (see below). If you are aligning to the baseline grid, you can also find those options here (under the other tab).

Inset Spacing and Vertical Alignment
InDesign’s Find/Change Feature – It’s Magic!
Ever been designing a document for a client (or your boss) and they decide that they want to change the color of all of the text on all 25 pages? Sounds like a daunting task, right? Well, if you are using InDesign (and if you aren’t please let me go ahead and tell you to bite the bullet – if you need all of the reason why, feel free to email me) you can do all of this at one time using the Find/Change feature.
Find/Change is under the Edit menu, or you can use the shortcut CTRL/CMD + “f”. This feature does work similarly to other “Find” features in other software programs, however instead of limiting what you can change and replace to actual text, you can also use this feature to find and change formatting within the document. You can even change object formatting, including effects!
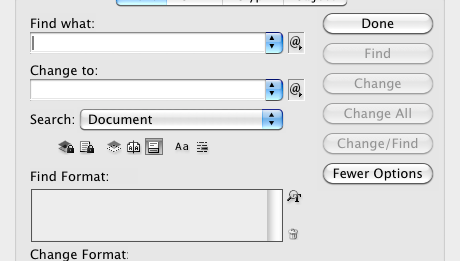
Take a look at the Find/Change dialog box below.

Notice the traditional Find, Change options at the top of the box. But then, if you look down, you will see the Find Format, Change Format options. If you click on the small magnifying glass with the “T” you will see the following options:

You can take a look at the different menus down the left-hand size of the dialog box and notice that you can search for font family, font style, kerning, leading, character color, etc. If you enter the information that you want to change and click “OK,” you can then enter what you want it changed to in the Change Format dialog box. Make sure your Search option is set to the correct setting (selection, document, all documents), then click Change.
You can also change object formatting by opening the Find/Change dialog box, then clicking on Object on the horizontal menu (text is highlighted by default). If you click on the magnifying glass, it will bring up the following dialog box, allowing you to enter basic attributes, as well as effects for objects, strokes, fills and text.

This feature is a very powerful tool that has saved me hours before. Hopefully it will make your life a little easier next time the boss says, “You know, I didn’t really like that font, color or drop shadow on that annual report after all!”
Happy Designing!
Here we go…
After many months, well make that years, of saying I was going to actually write a blog (not just reserve the blog name) I have finally done it. This blog will be updated at least once a week with tips and tricks for graphic and web design and the Adobe Creative Suite (InDesign, Photoshop, Acrobat, Illustrator, Dreamweaver, and even a little Flash.) If you have a specific question that you would like answered, or want help with any other software, please let me know.
Here we go!
